Robots.txt Test: How to Check If Your File Is Working
Apr 27, 2026
0 minutes reading time

SEO
Your robots.txt file quietly controls how search engines access your website. When it’s working properly, it helps guide crawlers. When it’s misconfigured, it can block important pages from being indexed, without you even noticing.
Running a proper robots.txt test is one of the simplest ways to avoid serious SEO issues.
What Is a Robots.txt File?
A robots.txt file is a simple text file placed in your website’s root directory (e.g., yourdomain.com/robots.txt).
Its role is to tell search engine crawlers:
- Which pages or sections they can access
- Which ones they should ignore
It doesn’t enforce rules, it gives instructions that most search engines follow.
Why Testing Robots.txt Matters
Even a small mistake in your robots.txt file can lead to:
- Important pages not being indexed
- Entire sections of your website being hidden from search
- Confusion for search engine crawlers
This is why running a robots.txt test regularly is important, especially after:
- Website updates
- Redesigns
- URL structure changes
- CMS migrations
Common Robots.txt Issues
Before testing, it helps to know what can go wrong.
Typical problems include:
- Blocking entire directories by mistake
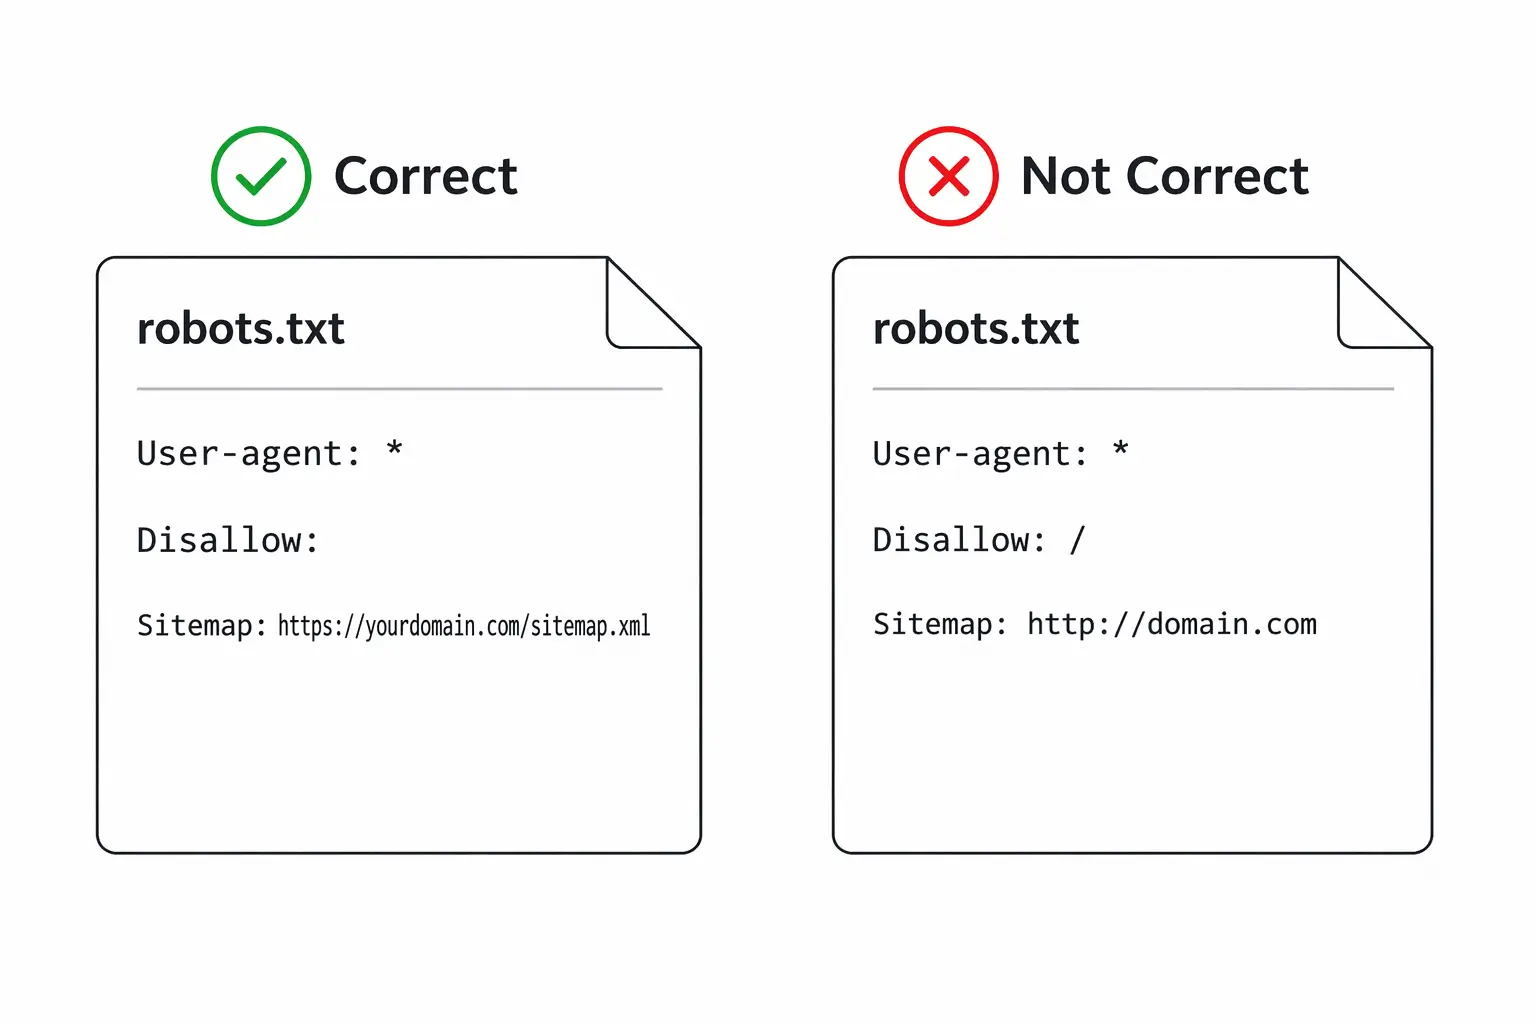
- Incorrect syntax (missing slashes, wrong formatting)
- Disallowing pages that should be indexed
- Conflicts with sitemap or meta robots tags
These issues are often not visible unless you actively check for them.
How to Check If Robots.txt Is Working
Here are the most practical ways to check if your file is working correctly.
1. Check the File Directly
Open your browser and go to:
yourdomain.com/robots.txt
Make sure:
- The file loads correctly
- There are no obvious errors
- The structure looks clean and intentional
This is a quick first step, but not enough on its own.
2. Use Google Search Console
One of the most reliable ways to perform a robots.txt test is through Google Search Console.
You can:
- See if your file is accessible
- Identify blocked URLs
- Understand how Google interprets your rules
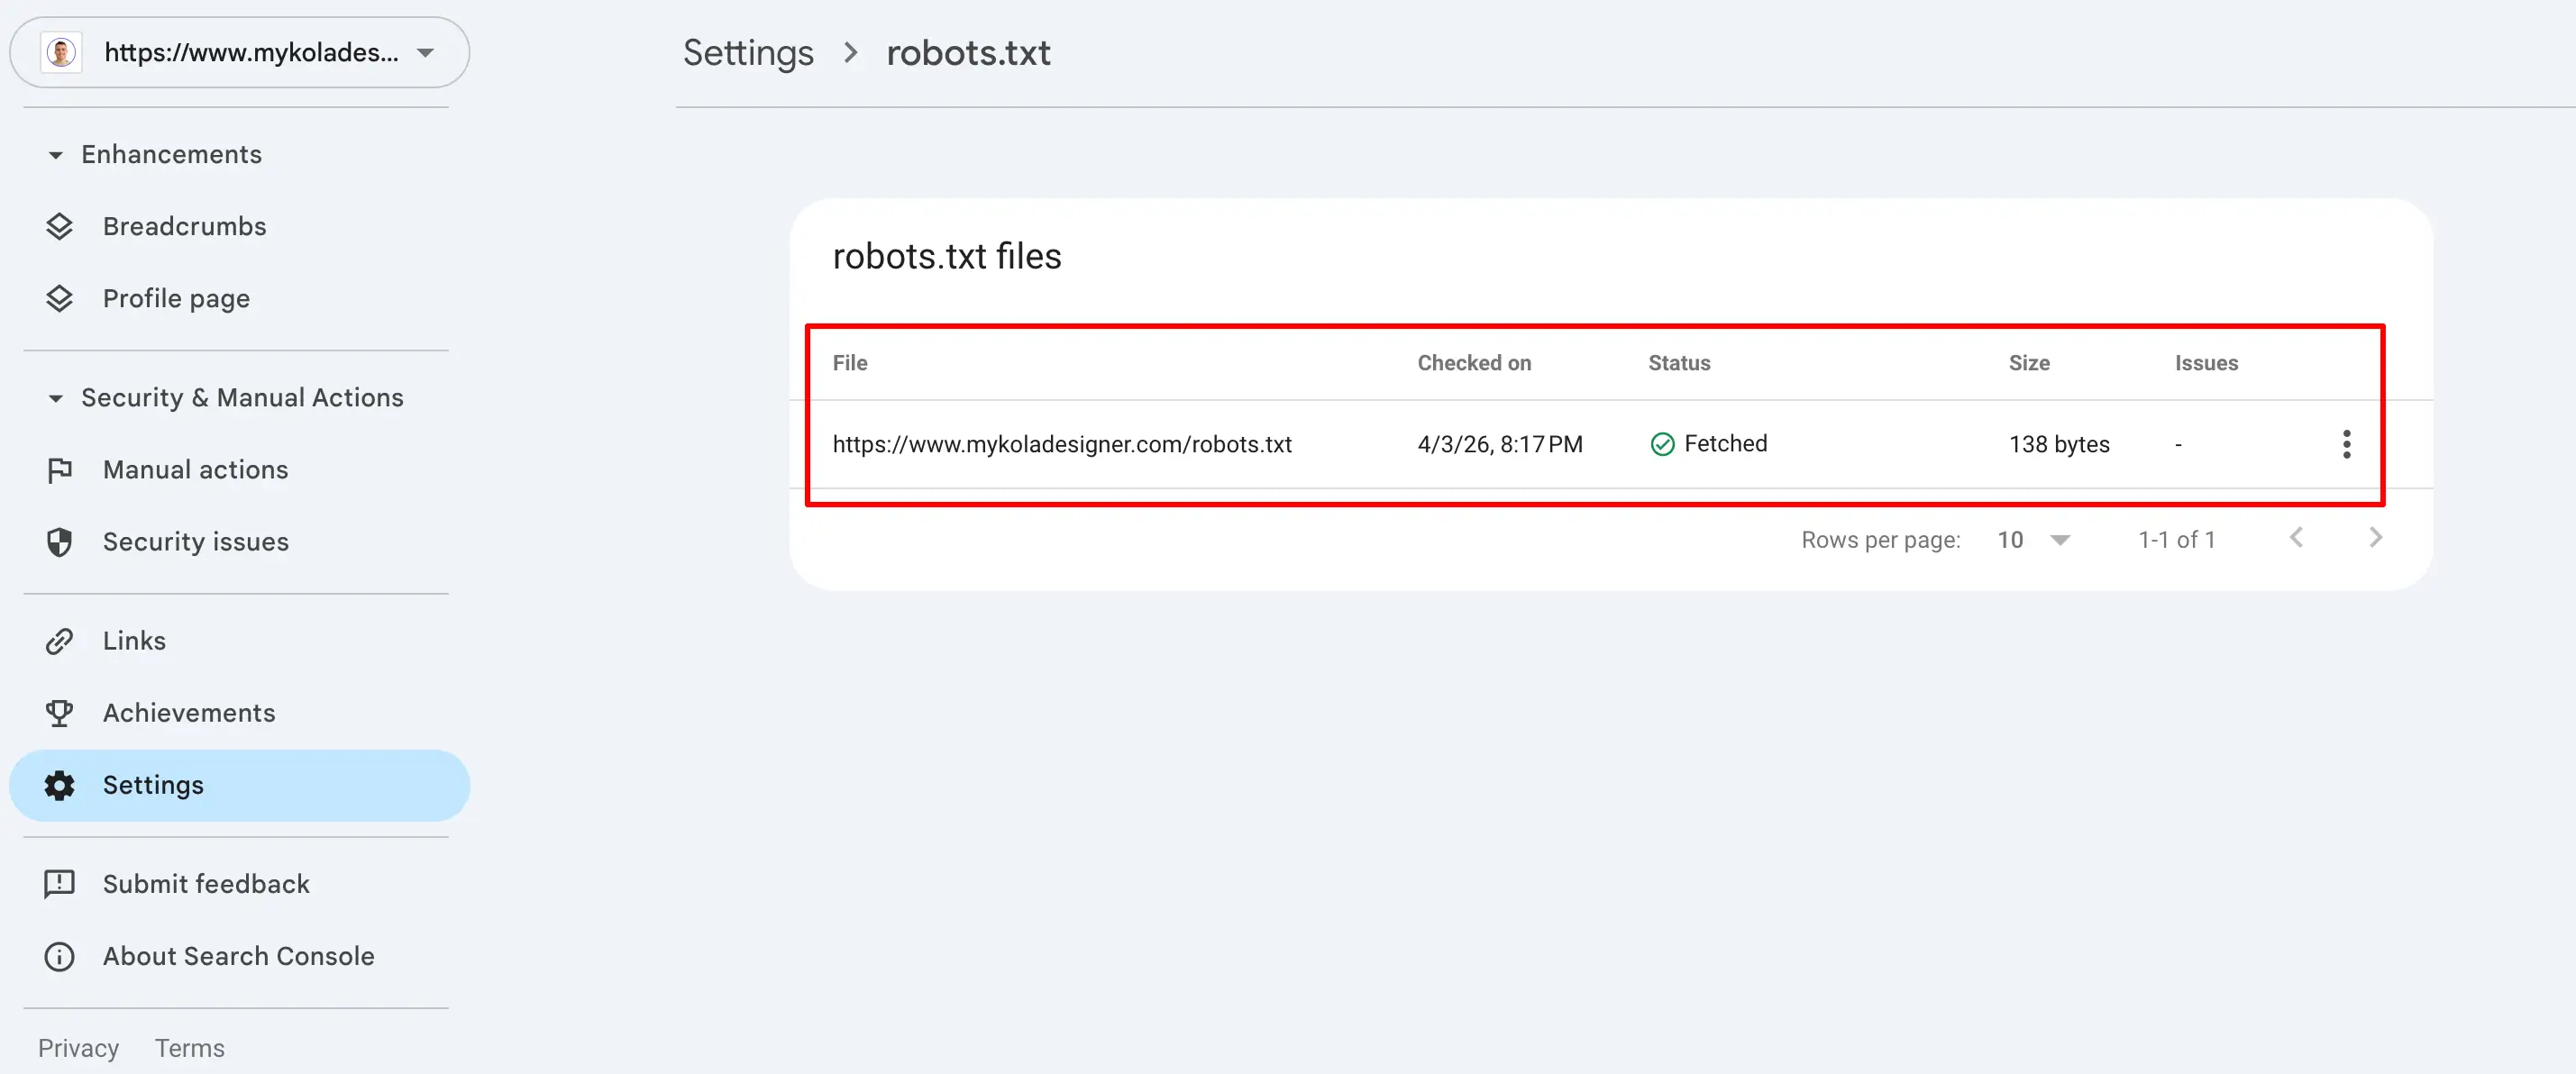
This gives real insight into how your robots.txt file affects indexing and supports a more accurate robots.txt analysis.
3. Test Specific URLs
Ask:
- Is this page allowed to be crawled?
- Is it accidentally blocked?
You can test URLs individually using tools or by reviewing your robots.txt rules.
Robots.txt example file:
User-agent: *
Disallow: /admin/
This blocks everything inside /admin/.
Small details like this can have big consequences if applied incorrectly.
4. Use SEO Crawling Tools
Tools like:
- Screaming Frog SEO Spider
- Ahrefs

can simulate how search engines crawl your site and show:
- Blocked pages
- Crawl restrictions
- Indexability issues
This is especially useful for larger websites.
How to Know If Your Robots.txt Is Working
If you're wondering how to test robots.txt file, here’s what a correct configuration should include:
- Allow important pages to be crawled
- Block only what needs to stay private or irrelevant
- Not conflict with your SEO strategy
Signs everything is working:
- Key pages are indexed
- No unexpected drops in traffic
- No critical crawl errors
If something feels off, it’s often worth reviewing both robots.txt and overall site structure together.
Common Mistake: Blocking Too Much
One of the most frequent issues is over-blocking.
For example:
User-agent: *
Disallow: /
This stops search engines from crawling your entire website.
It’s sometimes used in staging environments, but if it goes live, it can remove your site from search results entirely.
Robots.txt vs Meta Robots
It’s important not to confuse these two:
- Robots.txt controls crawling
- Meta robots tags control indexing
A page can still appear in search results even if blocked in robots.txt (without full content visibility).
This is why testing both is important.
UX & SEO Insight
From a UX and SEO perspective, robots.txt is not just a technical file, it directly affects visibility.
If search engines are unable to access your content correctly:
- Your pages won’t rank
- Users won’t find your website
- Your design and content won’t matter
This is one of those behind-the-scenes elements that has a direct impact on performance.

Final Thoughts
Running a robots.txt test doesn’t take long, but it can prevent major issues. It’s one of the simplest checks you can do, and one of the easiest to overlook.
If you're unsure whether your robots.txt file is configured correctly or aligned with your website structure, it’s worth reviewing it as part of a broader audit.
I help clients with technical SEO audits, identifying issues like this and fixing them before they impact performance.
Because when search engines can’t access your website properly, everything else becomes harder to fix later.
About the Author:

Mykola Ledenov
Design Partner
As a blog author at Mykola Designer, I explain how global teams can build high-converting and trust-building websites. In my articles, I combine strategic UI/UX design with expert marketing and no-code development and provide full-scale landing pages, brand identity systems, and SEO/GEO optimization for startups looking to turn concepts into scalable products.
Let’s connect on LinkedIn or X to build awesome projects together.
Share this article:
Other articles
In this article, I’ll explain what a modal in web design is, how it works, and when it’s appropriate to use. You’ll learn where modals are most effective, what pitfalls to avoid, and how to implement them as part of a user-friendly, goal-oriented design.
Whether you’re building a new website or refining an existing one, understanding modal web design will help you create smoother, more efficient user journeys.
What Is a Modal in Web Design?
A modal in web design is a user interface element that appears on top of the main content to deliver a specific message or request an action. It typically dims or disables the background and requires the user to interact with the modal before continuing.

In simple terms, a modal is a focused popup window that creates a temporary interaction layer. It’s used to prompt users to make decisions, complete tasks, or acknowledge important information, without navigating away from the current page.
Modals are part of many modal web design systems because they allow for streamlined interactions and can save users time when used correctly.
It’s important to note that modals often get confused with popups. The difference? A modal is usually triggered by user action (like clicking a button), while website popups can appear automatically. Modals also typically block background interaction, forcing the user to focus.
Key Characteristics of Modal Web Design
Modals are powerful UI elements that provide a focused way to engage users. But to use them well, it’s important to understand their defining traits. Below are the key characteristics that distinguish a modal from other interface elements, and explain why they’re so widely used in modal web design.
1. Overlay Effect
Modals always appear on top of the main page content, accompanied by a dimmed or blurred background. This overlay effect is designed to reduce distractions and isolate the user’s attention on the modal window itself.
It creates a visual hierarchy, signaling that what’s inside the modal is more urgent or important than what’s behind it. Until the user interacts with or dismisses the modal, the rest of the content becomes visually and functionally secondary.
2. Focused Interaction
The essence of modal web design is that it demands the user’s full attention. Unlike tooltips or dropdowns, modals temporarily disable interaction with the rest of the page. Users must complete an action, such as submitting a form, making a choice, or closing the window, before they can return to what they were doing.
This makes modals ideal for critical decisions, confirmations, or steps that shouldn’t be skipped.
3. Temporary and Contextual
Modals are designed for temporary use. They’re not meant to deliver long-form content or support complex navigation. Instead, they serve specific, contextual purposes, like displaying a login form, previewing product details, or showing a warning message.
Since they appear only when triggered by an action (like clicking a button), modals should feel like a natural extension of the user’s journey, not an interruption.
4. Clear Call to Action (CTA)
Every modal should guide the user toward a decision or next step. That’s why a strong CTA is essential, whether it’s “Submit,” “Cancel,” “Continue,” or “Close.” Without a clear CTA, the user may feel lost or uncertain about what to do next.
Good modal design also includes visual hierarchy in button placement and color contrast to make actions obvious and accessible.
5. Limited Distraction
A well-designed modal is clean and to the point. It avoids unnecessary design elements that could confuse or overwhelm the user. This includes limiting the use of animations, keeping copy concise, and avoiding cluttered layouts.
Minimalism in modal design supports faster decision-making and a smoother user experience, especially on mobile devices, where space is limited.
Getting these small UX details right, like when and how to use modals, can significantly improve the overall user experience and is often a key part of thoughtful web design.
Common Use Cases for Modals
Now let’s look at where they’re most effectively used. Modals can streamline user interaction, simplify complex tasks, and provide quick access to important actions, when applied thoughtfully.

Here are some of the most common and practical use cases for modal web design:
1. Login and Sign-Up Forms
One of the most familiar examples of modals is the login or sign-up window. Instead of redirecting users to a separate page, a modal allows them to log in quickly and return to what they were doing.
Why it works:
- Keeps users on the same page;
- Reduces friction during entry points;
- Provides a quick, familiar interaction.
2. Confirmation Dialogs
Modals are often used to confirm critical actions, like deleting data, submitting a form, or exiting without saving. These dialogs prevent accidental decisions by requiring a deliberate response.
Why it works:
- Interrupts the flow at key decision points;
- Encourages user accountability;
- Helps prevent irreversible actions.
3. Promotional Pop-Ups and Offers
Modals are also popular for time-sensitive announcements like discounts, newsletter subscriptions, or special promotions. These can be triggered by behavior (e.g., exit intent) or time spent on the page.
Why it works:
- Grabs attention without a full redirect;
- Encourages conversion at key moments;
- Can be personalized for higher relevance.

4. Product Previews or Quick Views
E-commerce sites often use modals to let users preview product details without navigating away from the category or search results page. This makes browsing faster and more seamless.
Why it works:
- Reduces clicks and page loads;
- Keeps users within their browsing context;
- Increases likelihood of continued exploration.
5. Image Galleries and Media Playback
In portfolios or media-heavy websites, modals are used to showcase full-size images, videos, or documents in a clean and distraction-free layout.
Why it works:
- Delivers immersive viewing without leaving the page;
- Makes it easy to close and return to the gallery;
- Ideal for creative, visual-first designs.
Pros and Cons of Using Modals
While modals can enhance usability when used correctly, they also carry risks if misused or overused. Like any design pattern, they should support, not disrupt, the user journey.
Let’s explore the key advantages and potential drawbacks of modal web design to help you decide when it’s the right solution.
Pros of Using Modals
1. Focused User Attention
Modals isolate content by overlaying the main page, allowing users to concentrate on one specific action or decision without distractions.
2. Efficient Use of Space
Instead of redirecting users to new pages, modals present content or forms within the same view, ideal for quick interactions like logging in or confirming actions.
3. Supports Task Completion
By pausing the background content, modals encourage users to complete an action before continuing, which can increase conversions and form submissions.
4. Ideal for Contextual Content
Since modals are triggered by user actions (like clicking a button), they provide content that feels timely and relevant, such as previews or quick settings.

Cons of Using Modals
1. Disrupts User Flow
Poorly timed modals, especially ones that appear unexpectedly, can interrupt browsing and lead to user frustration or higher bounce rates.
2. Accessibility Challenges
If not implemented properly, modals can be difficult for screen readers, keyboard navigation, or mobile users to interact with. Many fail basic accessibility standards.
3. Risk of Overuse
When overused, such as repeated pop-ups or stacking modals, they can feel invasive and cluttered, negatively impacting user trust and engagement.
4. Not Always Mobile-Friendly
On smaller screens, modals can be hard to navigate or dismiss, especially if they include too much content or lack clear close options.
Conclusion
Modals are a valuable part of modern web interfaces when used with clarity and purpose. They help streamline user actions, highlight key decisions, and improve interaction flow, especially when paired with clean, accessible design. Like any pattern, the key lies in thoughtful implementation: knowing when to use them, how to design them, and where they add the most value.
If you're refining your site's interaction patterns, modals can be a small change that makes a big difference in usability and engagement.
That’s where a website audit checklist comes in. It’s a structured way to review your site from top to bottom, covering SEO, content quality, technical performance, and overall usability. Instead of guessing what’s wrong, a proper audit gives you measurable insights into how your website performs, where it falls short, and what to fix first.

Whether you manage a large e-commerce platform or a small business website, running an audit regularly ensures your site stays fast, search-friendly, and user-focused. In this guide, you’ll find a comprehensive checklist for website audit that breaks down everything you should review, from on-page SEO and content relevance to Core Web Vitals and UX design.
By the end, you’ll have a clear roadmap for improving your website’s performance and creating a smoother experience for your visitors.
Why a Website Audit Matters
A website audit is more than a technical checkup. It is a deep analysis that shows how well your website performs across search visibility, usability, and overall efficiency. When done correctly, it reveals what helps your site grow and what holds it back.
Regular audits are important because search engines and user expectations constantly evolve. What worked a year ago might not be enough today. Algorithms change, competitors improve, and design trends shift. A website audit checklist helps you stay ahead by showing where your SEO strategy, content, or technical setup might be falling behind.
Here are a few key benefits of conducting regular website audits:
- Improved Search Performance: By identifying technical SEO issues, missing metadata, or duplicate pages, you can strengthen your site’s ability to rank higher in search results.
- Better User Experience: A faster, easier-to-navigate website keeps visitors engaged longer and helps reduce bounce rates.
- Stronger Conversions: Fixing broken links, updating content, and improving structure often lead to more actions such as sign-ups, inquiries, or purchases.
- Data-Driven Decisions: An audit gives you real data instead of assumptions, helping you prioritize what to improve first.

SEO Audit Checklist
The first step in your website audit checklist is to review SEO. Search engine optimization affects how easily people can find your website, how your pages appear in search results, and how relevant your content looks to users and algorithms. A proper SEO audit helps you discover errors, missed opportunities, and outdated practices that could limit your visibility.
1. Technical SEO
Technical SEO forms the foundation of every successful website. Start by checking whether search engines can properly crawl and index your pages.
- Crawlability: Make sure your robots.txt and XML sitemap are correctly configured and updated.
- Indexation: Check that important pages are indexed and duplicates or outdated URLs are removed.
- HTTPS and Security: All pages should load securely with HTTPS.
- Structured Data: Add schema markup where relevant to improve how your pages appear in search results.
- Redirects and Broken Links: Scan for 404 errors or redirect loops that can waste crawl budgets and frustrate visitors.
2. On-Page SEO
Once your technical base is solid, focus on On-Page SEO, optimizing what users see.
- Review meta titles and descriptions to make sure they are unique, keyword-focused, and within character limits.
- Check that every page has a clear H1 and logical heading hierarchy (H2s, H3s).
- Make sure your primary keyword and relevant variations appear naturally throughout the page.
- Audit internal links to confirm they guide users toward related pages and distribute authority evenly.
- Optimize images with descriptive alt text and clean file names.
3. Off-Page SEO
Even though off-page SEO occurs outside your site, it still plays a role in your overall audit.
- Review your backlink profile to identify toxic or spammy links that might harm your rankings.
- Track referring domains, brand mentions, and external citations for quality and relevance.
- Consider outreach or partnerships to strengthen authority in your niche.
Website Content Audit Checklist
Your content is what connects your website to your audience. Even if your site is technically perfect, weak or outdated content can hurt performance and reduce trust. A website content audit checklist helps you evaluate not just what you say, but how effectively you say it, across every page, blog post, and product description.
1. Review Content Quality and Relevance
Start by analyzing whether your existing content aligns with your brand message and audience needs.
- Identify outdated, thin, or duplicated pages that no longer serve a purpose.
- Check if your content answers user questions clearly and fully.
- Look for tone and style consistency across all sections of your website.
- Refresh old articles with updated data, visuals, and internal links.

2. Analyze Keyword and Search Intent Alignment
Your content should attract the right audience through search.
- Ensure each page targets a specific keyword and search intent.
- Avoid keyword stuffing and focus on natural language that fits user queries.
- Add related terms where appropriate to support contextual relevance.
3. Evaluate Readability and Engagement
Readable, structured content performs better both for users and search engines.
- Use short paragraphs, bullet points, and clear subheadings.
- Check sentence length and readability using tools like Hemingway or Grammarly.
- Include visuals such as infographics or charts to make information easier to digest.
- Track metrics like time on page and bounce rate to gauge engagement.
4. Check Internal and External Links
Good linking enhances both SEO and user experience.
- Verify that all internal links work and lead to relevant pages.
- Add links from high-performing pages to those that need more visibility.
- Review external links to ensure they point to credible, up-to-date sources.
Website Speed & Performance Audit
A fast, reliable website keeps visitors engaged and supports better rankings. Search engines consider speed a ranking factor, and users quickly abandon slow-loading pages. That’s why every website audit checklist should include a detailed review of your site’s technical performance.
1. Test Website Loading Speed
Start by measuring how quickly your pages load using tools like Google PageSpeed Insights, GTmetrix, or Lighthouse.

- Identify which pages have the longest load times.
- Compare performance across desktop and mobile devices.
- Focus on improving your Core Web Vitals: Largest Contentful Paint (LCP), First Input Delay (FID), and Cumulative Layout Shift (CLS).
2. Optimize Images and Media
High-quality visuals can easily slow your website if not optimized.
- Compress images without losing clarity using tools such as TinyPNG or Squoosh.
- Implement lazy loading for below-the-fold images.
- Use next-gen formats like WebP where supported.
- Ensure videos are embedded efficiently or hosted externally.
3. Reduce Code and Server Load
Your site’s backend plays a big role in speed.
- Minify CSS, JavaScript, and HTML files to remove unnecessary code.
- Limit the number of third-party scripts and plugins.
- Enable browser caching and use a Content Delivery Network (CDN) for faster global delivery.
- Review server response time and upgrade hosting if necessary.
4. Test Mobile Performance
Since most users browse on mobile, your audit should focus heavily on responsiveness.
- Make sure the design adapts properly to all screen sizes.
- Avoid oversized images and unresponsive buttons.
- Use Google’s Mobile-Friendly Test to identify and fix issues.
A performance-focused audit website checklist helps you identify where your site is losing speed and user attention.
Tools for Conducting a Website Audit
Performing a complete audit manually can take time. Choosing the right tools simplifies the process and gives you accurate data to act on. Below are some of the most effective platforms to include in your website audit checklist.
SEO and Technical Tools
- Google Search Console: Helps track indexing status, keyword performance, and crawl issues.
- Ahrefs or Semrush: Ideal for backlink analysis, keyword tracking, and competitor comparisons.
- Screaming Frog: A must-have for scanning your website structure, broken links, redirects, and metadata.

Performance and Speed Tools
- Google PageSpeed Insights: Tests speed and Core Web Vitals for desktop and mobile.
- GTmetrix: Provides waterfall reports that show which elements slow your pages down.
- Lighthouse: Offers detailed audits for performance, accessibility, SEO, and best practices.
Content and UX Tools
- Hotjar or Microsoft Clarity: Show heatmaps and user session recordings to visualize behavior.
- Grammarly and Hemingway: Improve writing clarity and tone consistency.
- Google Analytics 4 (GA4): Tracks engagement, traffic sources, and user actions to measure content effectiveness.
How Often to Audit Your Website
A website audit should never be a one-time task. The web evolves quickly, and small issues can grow into serious problems if left unchecked. The right audit frequency depends on your website’s size, traffic, and update pace.
- Quarterly Audits: Best for most businesses to catch SEO, speed, and UX issues before they affect performance.
- Monthly Mini Audits: A lighter review of content updates, new pages, and tracking setup.
- After Major Changes: Always audit after redesigns, platform migrations, or plugin updates to detect technical issues early.
Regularly following your website audit checklist ensures your site continues to meet modern standards for speed, security, and user satisfaction.
Conclusion
Your website is the core of your online presence. Keeping it optimized requires consistent attention to detail, not only in how it looks, but in how it performs. By following a structured website audit checklist, you can spot weaknesses before they impact your audience and turn your site into a stronger, faster, and more engaging platform.
If you need expert help analyzing and optimizing your website, I offer SEO services designed to improve visibility, speed, and user experience, ensuring your website performs at its best in every area.
By understanding the various stages of a customer’s journey, businesses can deliver targeted messages, increase conversions, and maximize the long-term value of each customer.
In this article, I’ll explore what lifecycle marketing is, the stages involved, and how businesses can leverage lifecycle email marketing to turn first-time visitors into loyal advocates. Whether you’re just starting or looking to refine your existing strategies, this guide will provide you with the insights you need to enhance your customer relationships and boost your marketing ROI.

What is Lifecycle Marketing?
Lifecycle marketing is a strategy centered on connecting with customers throughout every stage of their journey with your brand. It’s not just about attracting new customers; it's about nurturing relationships and guiding them through the entire lifecycle, from first interaction to becoming loyal, repeat buyers.
The concept of lifecycle marketing revolves around understanding the different phases a customer goes through and tailoring your messaging and efforts accordingly. By delivering personalized, relevant content and offers at the right time, businesses can create an experience that resonates with customers, encouraging them to take action and stay loyal.
Lifecycle marketing can be implemented across various channels, with email marketing being one of the most effective tools for nurturing customer relationships. By setting up automated campaigns that address each stage of the customer lifecycle, you can ensure that your marketing efforts are timely, relevant, and impactful.

The Stages of the Marketing Lifecycle
Understanding the stages of the marketing lifecycle is crucial to developing effective strategies that move customers through each phase. Each stage presents unique opportunities for engagement, and tailoring your marketing efforts to these phases ensures you meet the evolving needs of your audience.
Let’s explore the key stages of the marketing lifecycle:
Stage 1: Awareness
The journey begins with awareness - this is when potential customers first learn about your brand. They might come across your website through a Google search, social media, or an ad campaign. At this stage, they are not yet familiar with your services and are looking for solutions to their problems.
- Marketing Strategy: Prioritize content that builds brand awareness and informs your audience about who you are and how you can help. Blog posts, social media content, and ads that highlight your products or services can help generate interest and encourage them to explore further.
Stage 2: Consideration
Once a potential customer is aware of your brand, they move into the consideration phase. They start researching and comparing different options to find the best fit for their needs. This stage is about convincing prospects that your offering is the right choice.
- Marketing Strategy: Provide more in-depth content like case studies, whitepapers, webinars, or product demos that help answer questions and showcase your expertise. This is also a great time for retargeting ads and email campaigns that highlight the benefits of your products or services.
Stage 3: Decision/Conversion
At this stage, customers are ready to make a decision. They are evaluating their options and deciding whether to take the next step, whether that’s making a purchase, booking a consultation, or signing up for a service.
- Marketing Strategy: Here, you want to make the conversion process as seamless as possible. Offer limited-time discounts, clear calls-to-action (CTAs), and easy-to-follow steps for completing the purchase. This is the time to show your value and provide incentives to push prospects toward making a decision.
Stage 4: Retention
After conversion, the goal shifts to retaining the customer. Building a relationship post-purchase is essential to turning one-time buyers into repeat customers. This stage focuses on delivering ongoing value and maintaining customer engagement.
- Marketing Strategy: Implement loyalty programs, personalized email campaigns, or follow-up surveys to continue the conversation. Offering exceptional customer service and addressing any concerns promptly ensures that customers feel valued and are likely to return.
Stage 5: Advocacy
The final stage of the lifecycle is advocacy, where satisfied customers become your brand ambassadors. They not only continue to buy from you, but they also refer others, share positive reviews, and help promote your brand.
Marketing Strategy: Encourage referrals by offering incentives like discounts or exclusive offers. Engage customers with social media content, ask for testimonials, and create opportunities for them to share their positive experiences. Building a strong community around your brand helps turn loyal customers into passionate advocates.

What is Customer Lifecycle Marketing?
Customer lifecycle marketing is a strategic approach that focuses specifically on the journey of individual customers, using personalized tactics to build long-term relationships. Unlike traditional lifecycle marketing that often looks at broad audience segments, customer lifecycle marketing dives deeper into the individual’s unique behaviors and preferences throughout their journey.
By analyzing customer data and interactions, businesses can develop a tailored marketing strategy that guides customers through the lifecycle stages in a way that feels personal and relevant. This means sending the right message at the right time, whether it’s a welcome email, a re-engagement campaign, or a targeted offer based on past purchases.
The ultimate goal of customer lifecycle marketing is to maximize the lifetime value (LTV) of each customer by creating experiences that are not only engaging but also rewarding. Through careful segmentation and automation, businesses can ensure they’re delivering highly relevant content and offers, leading to higher retention, repeat purchases, and increased brand loyalty.
Lifecycle Email Marketing
Lifecycle email marketing plays a pivotal role in guiding your customers through each stage of their journey. It allows businesses to nurture relationships, stay top-of-mind, and encourage repeat interactions in a way that feels personalized and timely.
How Lifecycle Marketing Works with Emails
Lifecycle email marketing includes sending automated, targeted emails based on a customer’s behavior or position in the customer lifecycle. Whether they’re a first-time visitor or a loyal customer, each stage of their journey offers opportunities for engagement through tailored messaging.
Here’s how email marketing fits into each lifecycle stage:
- Awareness Stage: In the awareness phase, customers are just getting to know your brand. Email content should focus on introducing your business, providing helpful educational content, and offering incentives like first-time visitor discounts to encourage engagement.
- Example: Welcome emails or introductory offers that help visitors learn about your brand and the value you provide.
- Consideration Stage: At this point, customers are assessing your offerings and comparing them to other options. Email campaigns at this stage should aim to build trust and highlight the value your products or services provide.
- Example: Case studies, product guides, or comparison emails that show how your service stands out from competitors.

- Conversion Stage: This is when customers are ready to take action. Conversion-focused emails should be clear, persuasive, and include strong calls to action, such as limited-time offers or cart abandonment reminders.
- Example: Discount offers, limited-time promotions, or special deals to nudge customers toward completing their purchase.
- Retention Stage: Once a customer makes a purchase, lifecycle emails play a key role in keeping them engaged and strengthening their loyalty. Emails at this stage might include thank-you notes, product usage tips, or loyalty rewards.
- Example: Thank-you emails, post-purchase surveys, or loyalty program updates.
- Advocacy Stage: Once customers are satisfied with their experience, encourage them to become brand advocates. Emails at this stage should encourage referrals, feedback, or social sharing.
- Example: Referral program invitations, request for reviews, or social media sharing prompts.
By automating emails for each stage of the customer lifecycle, you can ensure that your messaging is always relevant and timely, providing customers with what they need when they need it.
Best Practices for Effective Lifecycle Marketing
To get the most out of lifecycle marketing, here are some best practices to follow:
1. Personalization is Key
Personalization goes beyond simply using a customer’s name in an email subject line. It’s about delivering content that aligns with their specific needs and preferences. Tailoring your messaging based on past interactions, preferences, or behaviors can significantly improve engagement and conversion rates.
2. Use Automation Wisely
Automation helps scale your lifecycle marketing efforts while ensuring that customers receive the right messages at the right times. Tools like CRM systems and email platforms allow you to set up automated workflows based on customer behavior. This reduces manual work while ensuring timely and relevant communication.
3. Segment Your Audience
Not all customers are at the same point in the lifecycle, so it’s essential to segment your audience accordingly. Use data like past purchases, browsing behavior, or demographic information to create tailored marketing campaigns that resonate with specific customer segments.
4. Track and Optimize
Lifecycle marketing is a dynamic process, and tracking performance is essential for ongoing success. Regularly review your data to identify which campaigns are working and which need improvement. Testing different email formats, subject lines, and offers can help you find the most effective strategies.

Benefits of Lifecycle Marketing
Lifecycle marketing offers numerous benefits for businesses looking to build long-term customer relationships:
- Increased Customer Retention: By nurturing customers at every stage, lifecycle marketing helps improve customer retention. Customers who feel valued are more likely to return for repeat purchases.
- Higher Customer Lifetime Value (LTV): Lifecycle marketing ensures you maximize the potential value of each customer by encouraging repeat purchases, cross-sells, and upsells.
- Improved Marketing ROI: By focusing your efforts on the most engaged and relevant customers at each stage, you can optimize your marketing spend and achieve better results.
- Better Customer Understanding: Lifecycle marketing helps you gain deeper insights into your customers' preferences and behaviors, allowing you to craft more effective and relevant campaigns.
Common Challenges in Lifecycle Marketing
While lifecycle marketing offers significant advantages, it can also present challenges:
- Data Collection and Management: To effectively implement lifecycle marketing, you need accurate and up-to-date customer data. Gathering and organizing this data can be a challenge, especially as customer touchpoints increase.
- Scaling Personalization: Personalizing content for each customer stage requires robust systems and tools. As your business grows, maintaining personalized experiences for each customer can become more complex.
- Maintaining Engagement: Keeping customers engaged throughout the lifecycle, especially after a purchase, can be difficult. Consistently delivering valuable, relevant content is essential to avoid losing interest.

Conclusion
Lifecycle marketing is a strategic approach that can help businesses build long-lasting customer relationships, increase conversions, and improve ROI. By understanding the stages of the customer journey and tailoring your marketing efforts accordingly, you can guide potential customers from first click to loyal advocate. Email marketing, segmentation, automation, and personalization are all key components in executing successful lifecycle marketing strategies.
As you integrate lifecycle marketing into your business strategy, remember that it's about building relationships, not just making sales. A well-executed lifecycle marketing strategy will not only increase customer retention but also turn your clients into brand ambassadors, driving sustainable growth for your business.